
Manual for the Removal of the Pitch Slider Center Click on the Technics SL1200/1210 Turntables
By Keck
keckdj@yahoo.comBefore you begin:
Disclaimer: I'm not responsible for anything you do to your decks. This text is for informational purposes only. What you do with your decks is your decision and if you mess them up don't blame me. If you have no experience with electronics then don't take them apart.
Before you touch any circuit electronics be sure to discharge yourself of static charge. Just touch a metal casing like a computer or mixer or doorknob, anything metal.
This whole process is not necessary on the new SL1200 M3D’s because they are made without the click. Using one of these new ones was my inspiration for doing this to my decks.
A really good source of technical information about the Technics SL 1200/1210’s is http://music.hyperreal.org/dj/sl1200.html
The Panasonic web site is where you can find most parts. You can also look up your local Technics certified technician there. Go to
http://www.pasc.panasonic.com/epartr/ then type SL1210 in the model number section.I would suggest buying the new slider for the SL1200 M3D model and just switching that one with the one in the MK2’s but I cant find it on the parts web site. If you happen to find out where they could be ordered from then email me so I can update this manual.
Never turn the table on when the platter is not on. Nothing bad will immediately happen, but its not good for the motor.
Removing center bypass circuitry only
This will allow your pitch slider to be one continuous pitch control. The center bypass circuit cuts out the value that the pitch slider sends out and just automatically sets the pitch to 0%. This would be fine if the pitch slider potentiometer was perfect and never fell off center with age. Another problem is that even when the tables are new the smallest movement from the zero click is not enough for a perfect beat match. So this section will show you how to just remove the bypass circuitry. This will not remove that annoying physical "click" at the center, if you want to do that also keep reading down to "Removing the Center Click."
This should take about 1 hour for 2 decks.
To do this you will need a soldering iron, basic soldering skills and some electrical tape. If you don’t have any soldering skills don’t learn on you 1200’s. Find a friend who can do it.
This looks a lot more complicated than it is. So don’t get scared.
-Unplug the turntable
-Remove the needles
-Be sure the tone arm is locked in place
1)Get a pillow and place the turntable upside down on it.
2)Unscrew all the feet.
3)Unscrew all the screws under the feet. Note these are the long screws.
4)Unscrew all the other screws. Note there are 2 types of screws. Make note of where the correct screws belong.
5) Shake off the bottom casing.
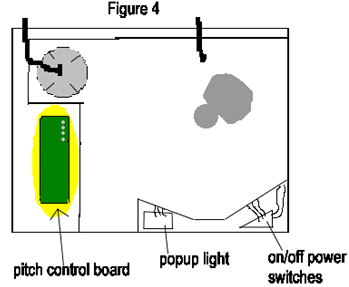
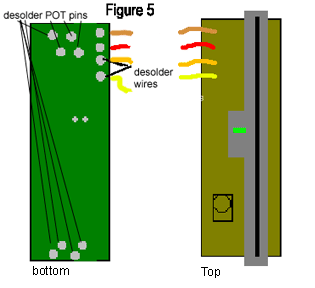
6) Find the pitch board on the left. It is a rectangular green circuit board (See fig 4).
7)Desolder the 2 bottom wires. (Should be Yellow and Orange) if not email me at keckdj@yahoo.com so I can make a note of it. (see fig 5)
8)Wrap them up in black electrical tape so that they NEVER touch.
9)Put the bottom casing back on. Put all the screws back in and put on the feet.
10) Plug it in, and test it out. If the green light does not go on when the pitch slider is in the center then you’ve done it!! Now enjoy. If you really want the whole shebang then keep reading on how to take out the center click also.
This will make your pitch slider nice and smooth from top to bottom with no click in the center. You do need intermediate skills with electronics. So don’t try it if you’ve never done anything like this before. It takes about 2 hours for 2 tables.
You will need needle nose pliers, a soldering iron, a solder sucker/braid, flux (optional), and electrical tape.
-Unplug the turntable
-Remove the needles
-Be sure the tone arm is locked in place
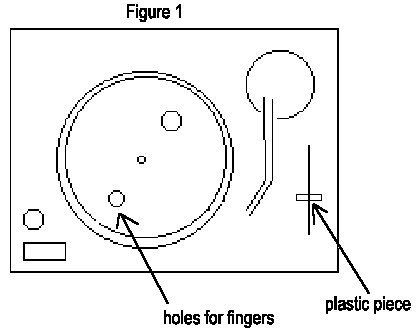
1)Pull off the plastic piece on the pitch slider, Save the little piece of felt also. ( see fig 1)
1)Remove the top platter – Pull it with your fingers in the two holes and your thumb on the middle axis pole. (see fig 1 ) Never turn the turntable on without the platter.
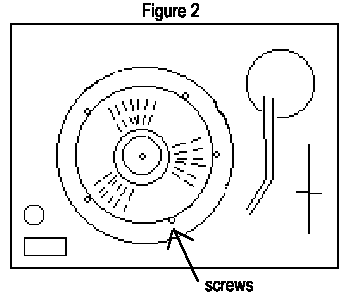
2) Unscrew the plastic cover that is underneath the platter ( see fig 2)
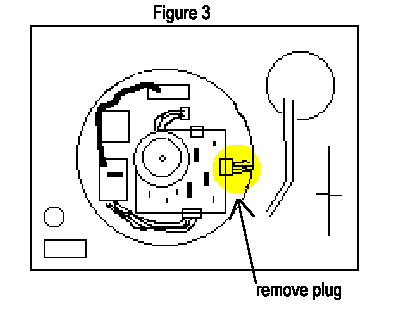
3) Find the plug on the right of the circuit board with 4 wires going into it. The wire colors on my tables are brown, red, orange, yellow. If your colors are different let me know keckdj@yahoo.com. Pull out that plug by just pulling it. (see fig 3)
4)Get a pillow and place the turntable upside down on it.
5) Unscrew all the feet
6) Unscrew all the screws under the feet. Note these are the long screws.
7) Unscrew all the other screws. Note there are 2 types of screws. Make note of where the correct screws belong.
8) Shake off the bottom casing
9) Find the pitch board on the left. It is a rectangular green circuit board. (See fig 4 )
10)There are 2 screws holding the pitch control board. Unscrew them and pull out the whole board. Note the ground wire connected to the top screw. Don’t forget to put that back on later.
11) look at the board from its side. You will see a little hole on the side of the slider POT. (see fig 6) When the slider is in the center a little ball pushed by a spring locks into the hole. You will be removing that ball.
12) Desolder the green LED. Take it off noting its orientation. It must go back in the same way.
13) Desolder with a solder sucker/braid all the pins holding the pitch slider (called a slider potentiometer). I will call this the POT from now on. Some of the pins are twisted to hold the POT in place tightly. After desoldering them untwist them with the needle nose pliers. (see fig 5 )
14) Completely remove the POT from the circuit board. Note witch way was up
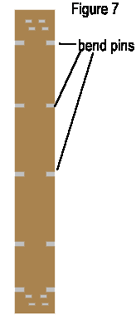
15) Bend all the pins holding the brown bottom of the POT with some needle nose pliers or whatever you think will work that you may have lying around. (see fig 7 )
13) Carefully take off the brown bottom. Note which way is up, Don’t get any of the grease on you. Its good for the POT. Place the brown bottom face up on a piece of paper.
14) You can now see the plastic slider. Within this there is the metal ball which is pushed by a spring and into the hole at the center. That is the click.
15) Pull out the plastic slider. Note which way is up. If you want to keep the ball and spring for some future date to replace them, then pull the plastic slider out slow with your fingers hugging the sides so the ball doesn’t pop out. Then let your fingers go allowing to ball to fall onto a piece of paper where you can catch it.
-now we go backwards putting the whole thing back together
16) Replace the plastic slider with the correct orientation.
17) Put the brown bottom back on
18) Bend the pins back with some pliers being sure it is nice and secure
19) Put the POT back on the circuit board. Twist the pins that were twisted
20) Solder all the pins again. If you have Flux use it. Flux helps protects the solder from oxidation.
21) Put back the green LED. Solder it the same way it was before
22) To remove the centering circuitry, desolder the bottom yellow and orange wires on the pitch circuit board, as told in the previous section. (see fig 5) Then wrap them in black electrical tape so that they DO NOT touch.
23) Place the circuit board back where it was.
24) Put the screws back in, making sure to attach the ground wire also.
25) Flip the Table over on the pillow. Plug the 4 wire plug back in
26) Replace the platter, not the plastic cover, this is a test run so you don’t have to put everything back on.
27) Plug it in. turn it on. Make sure everything works properly. This is a good time to check if your zero is off. See techsfaq " Adjusting the slider for true 0 at center" to do this test, if the zero is off fix it then come back to here.
28) Unplug the table.
29) Take off the platter
30) Screw the plastic cover back on
31) Flip it over
32) Put back the bottom cover
33) Put all the crews in, and then the feet
34) Flip it over, put back the platter
35) Replace the felt and plastic slider cover.
36) Voila! Enjoy you new home made M3D
|
|
|
|
|
|
|