|
|
|
|
|||||||
|
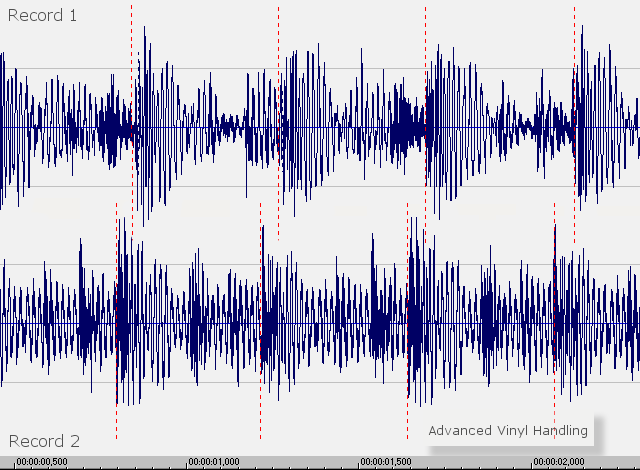
The intro is usually a lean version of the main theme. A lot of sounds which are part of the main body can not be heard. Sometimes the intro starts with just the bass drum. In other cases the bass is left out of it untill the 2nd stage: the body. The body represents the full all-sounds-included main theme of the track. In some cases there is a break WITHIN the body without actually leading up to the big climax. Those are not of great importance to the actual DJ-ing. This is not to say you can ignore them easily. You still have to be aware of them, but you do not have to avoid mixing this kind of break with the other record. This is in contrast to the breaks(downs) which build up to the climax. In general terms: a break is that part of the track where MOST of the music stops, as the proverbial "silence before the storm", in order to build up the tension. The climax, of course, is the moment where this build up tension is released by bringing back the bass and main theme of the track. (This is also the moment where -in case of a very good build up and climax- the crowd starts to yell... Chills down your spine and/or goose bumps are also indications that it is a brilliantly composed climax.) ( In the rest of the text: when I refer to a break, I mean the type that builds up to the climax. ) Some DJs state that the build up is holy. Never Ever Ever "touch" a build up by mixing another record through it. In most cases I agree, but there are always exceptions to that rule. The fact is one can ruin a beautiful build up by putting in a beat from another track. 4 Beats make up a bar, several bars make a loop, repeat the loop a few times and you have the theme (the characteristic melody of the track) and repeat the theme a few times and you have a Stage. Loops are 4 or 8 bars, most of the time, themes are 16 to 32 bars (2 to 8 loops) and 2 to 8 times the theme makes the intro, body, break/build up/climax or exit. If you are new to DJ-ing, this is all there is to know for now. Once you are familiar with your records and you can rely more on your skills you will learn to line up the stage of the incoming record with the stage of the current one, so the exit of outgoing record will co-incide with the body of the incoming record. See the ADVANCED section further down. Back to the top. Manipulating Vinyl Getting the incoming record at exactly the same speed (or 'pitch', it's the same thing) as the current record is not enough. You also need to to line up the incoming record so that they are in phase: Synchronised. In other words: The beats of both records need to be heard as one. Even if you have the pitch of the records exactly right, if one record is lagging behind, you still hear a dreadful double bass. This can best be described with the following figure:
As you can see, the shift between these two waveforms doesn't change much over time: Both records have the same speed, but one is ahead of the other. In order to get the incoming record in phase with the current one, you have to be able to temporarily slow down or speed up the record: Giving it an extra push to catch up, or brake to slow it down. In the figure you can see record 2 lagging behind record 1. Assuming that
channel 1 is open (that is: record 1 is played over the speakers) you have
to manipulate record 2. In this case it has to be sped up temporarily.
There are various ways to do this, each with their own benefits and
drawbacks:
And to get right to the point of explaining:
As alternative to slow down you can firmly tap the rim. Less audible, but also less controlable. Flicking a finger forward along the rim can push the record forward. Same applies here too: less accurate and less audible.
If you master method #5, you can make the perfect transitions. The combination of #1 and #5 is used by a lot of top-class DJs. Method #1 to get it approximately right, and #5 to annihilate any difference left. If this is executed correctly, the audience can hear NO glitches and/or changes in pitch whatsoever. In other words: perfect mixing. Then again, if you use method #1 to perfection before you start to make the transition, the crowd will hear no glitches or changes in pitch either. This would be more perfect mixing (!). Back to the top. Beat Matching Time to add Track Structure to Manipulating Vinyl and try to synchronise 2 records... Start with 2 records which have, judging by listening to them, about the same BMP (Beats Per Minute). Start the first record. (Check the RPM.) Set the gain for the record in such a way that the VU meter will peak between 0 dB and +3 dB. Get the 2nd record and perform the same operation. The first matching has been done: the volume of both records are the same. Make sure that you set the gain when the record is playing the body or at least an equally loud part. If you would perform this while the intro is playing you could end up with a record peaking between +3 dB and +6 dB when it is playing the normally louder body. Convention:"Record 1" is the record that is being put over the speakers and is being heard by the imaginary or real crowd. Likewise, "Channel 1" is the slider on the mixer that belongs to Record 1. "Record 2" is the record that needs to be "brought into phase" with Record 1. Same story for "Channel 2". The first thing you need to practice is Jump starting. | ||||||||||||||
|
BEWARE: Message for the REALLY inexperienced beginners: YOU
HAVE TO USE SLIPMATS!, otherwise you will ruin your records when you
manipulate the vinyl. |
||||||||||||||
|
Slipmats, usually made from felt, are used instead of those thick rubber slabs most turntables have. They allow the turntable to keep on turning while you hold the record. Jump Starting means you start a record exactly at a beat, exactly WHEN you want to. (Also referred to as cue starting.)When you master this trick you can -at least for a moment- have 2 records run in phase. First you need to find the first beat of the record. You can do this by simply waiting to hear it, but of course there is a better way... And before you continue: there are more ways to start a record at exactly the right time. If you know or discover a different way to jump start a record, feel free to use it. As long as the result is the same. DO NOT be afraid to harm your record, turntable or stylus. Just about everyone who starts with DJ-ing for the first time will be TOO careful. Just build up confidence. As long as you follow the proper procedures you will not damage anything. It is just a matter of getting used to the feel and handling of vinyl. Normally you will find the first beat of the record in the first centimetre or 1/2 inch of the track. Just pick up the arm and place it a little bit further ahead on the record. Once you hear a beat you have to spin back the record. Just leave it on the turntable, the slipmat will allow you to backspin the record without the need to stop the turntable. Think of this as the search option on a CD-player. Place a finger on the edge of the record label and rotate the record in the desired direction. Once you have found the part of the groove where this first beat starts, place a finger on the edge of the record or the edge of the label. By pulling back and forth the vinyl you can precisely locate that area on the record where the first beat is. As long as you are practising you can open both channels, so you can hear what you do over the speakers. However, it is more realistic to use your headphone to listen to record 2, while channel 1 is open to play record 1 over the speakers. OK, so you have that first beat right under the needle. The trick is to release the vinyl from under your fingertip... Just swing your left hand back and forth a couple of times to get the feeling of where that beat is. It can happen during backspinning that the needle jumps out of the groove into one next to it. Then you will have to repeat the fast search procedure again with a finger on the edge of the label before you can locate the first beat again. If this happens often: Check the balance weight on the arm. You should have the full 5 grams of weight on the needle in order to reduce this jumping over. Sometimes a record is too warped to handle properly, in that case you have to do the fast searching less fast. In this case you have to jumpstart a record by holding it at the label instead of the rim of the vinyl. This is tricky, so it will require more effort. Braking and speeding up can still be done the normal way, because you touch the rim of the turntable, not the vinyl itself. And now, with the beat as it were right under the stylus/needle, you are ready to jump start. Start the other record, if you did not do so already, and open both channels on your mixer. You can also choose to open only channel 1 and cue the incoming Record 2 to your headphone. Move your left hand back and forth a couple of centimetres (two inch or so) so you can repeat the beat at command. Try to repeat the beat in such a way that you match the beat of record 1. Once you are able to repeat the first beat of record 2, nicely timed with the beat of record 1, try letting it go... And open channel 2, if you did not do so already... At least for a short time (a few seconds) you should be able to hear them synchronised. Now it's time for adjusting the speed... Exercise:Jump through a track by moving the needle a few mm at a time (a quarter inch or so) and try to find the point where the break changes into the climax. Once you find it, locate the exact beat which marks the start of the climax. Do not limit this to one record, try it with several records. And while you are at it: Notice the difference in structure *ON* the vinyl. A break reflects the light differently compared to the body. This will help you later on to locate and recognise the different stages of the track faster. (And it will tell you how much of the track there is left to be played.)
In the photo above you can clearly see the following, working from the outside inwards:
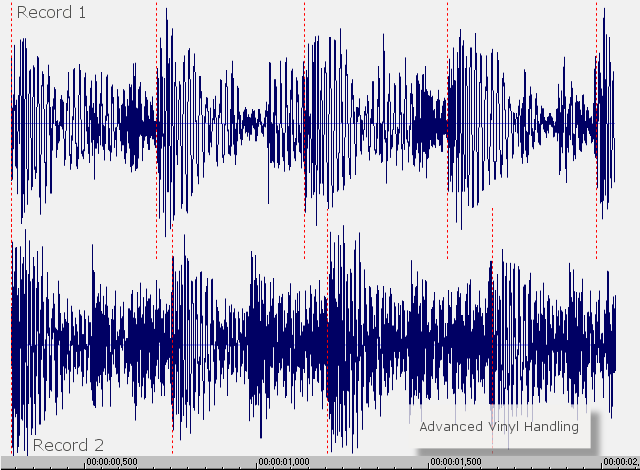
Back to the top. Beat Matching, Continued After jump starting a record you need to listen carefully and find out if the incoming record (record 2) is ahead or lagging behind the current record (record 1). This is not as easy as it may seem. The difference you hear can be A) only out of phase or B) out of phase AND a difference in speed. The image below will give you some idea what could happen. It shows 2 waveforms with different speeds. As you can see, the first beats are still is in synch with each other. Record 2 runs that much slower that on the second beat there is already a big gap.
( This image is somewhat exagerated: a difference of a quater
beat within 4 beats is quite an extreme difference. )
Question: Ok, I get the idea, but how do I
detect any difference in speed or phase? Answer: Use only one of the 2 speakers of your headphone to listen
to the incoming record, record 2. Leave the other ear open to hear the currently
playing record, record 1. Decide for yourself which side and put one of
the pads of the headphone behind the ear or in your neck. It is also
possible to hang the headphone around your neck and put one of the pads on
your shoulder. With a tilted head and a pushed up shoulder you can listen
to the pad. This results in a very typical DJ stance and, possibly, some
aching neck and shoulder muscles. It is not very wise to use fragile headphones! Especially when you
put one of the pads on your shoulder they twist: it's not something which fragile
headphones can endure repeatedly. Another important technical thing to know concerns the mixer. Every
channel has a switch which lets you cue the channel. It does not
matter if that channel is open or not, the mixer will send the music to
the headphones. This allows you to listen to record 2, while record 1
is playing. Cueing both channels (or more, if you have a multi channel
mixer) will send the signal of both records to the headphone. (Personally I prefer to put one of the pads behind the ear, without any preference for left or right.) Step One: if there is a difference after jump starting try to determine what it is: Lag or Ahead, and try to correct it. Step Two: *IF* -by chance- you got the speed exactly right, proceed to step Three. Otherwise you need to combine 2 actions.
How much you need to change pitch and brake/speed up a record depends on the initial difference in speed between the 2 records. It simply takes a lot of practice. Once you have some experience you will be able to determine if braking or speeding up is required. Later on, with more experience, you will also be able to determine how much to brake or speed up and how much to change pitch given a certain difference. This is a repeating process where you constantly diminish the difference and get the records in phase again. The remaining difference in speed will slowly make those records go out of phase again. Determine the nature of the difference again (Lag or ahead) and repeat the process. This way you will zero in on the right speed. Once the difference is small enough (and it will take about half a minute before you start to hear a double beat) it is time to move to step three. Try to avoid mixing records close to the 0% pitch. In practice most turntables show some decrease in pitch accuracy around the point where you feel the slider click. If you are within 2 mm (1/10th inch) of the 0% point, and you suspect you might end up at 0%, change the pitch of record 1 so you stay outside the -0.5% +0.5 % pitch region. Step Three: At this point we have record 2 at the same Speed/BPM as record 1. Now you have to, as it were, insert record 2 at the right moment. Remember what was mentioned about structure ? First off: you need to make sure the beats match, so you don't hear a double beat. Next to that, the bars have to be synchronous. Every first beat in a bar of the incoming record should match with every first beat of the current record. See the figure below.
Record 2 is lagging one beat behind. On a rare occasion this may not be much of a problem, but in most cases it sounds terrible. For now this is all you have to be aware of. Later on you can try not only to match bars of both records and -even better- loops and themes. (Leave matching themes and stages for now. Try that when you are more experienced.) So, got the beats and bars synchronised (in phase and at the same speed)? Time to start working with the mixer... Back to the top. |
||||||||||||||
|
|
||||||||||||||
| © 1999 - 2002. It is not allowed to duplicate this text or parts thereof without written permission of the author: Geert-Jan Pluijms. | ||||||||||||||